I am currently in the middle of a spring-time architectural photography tour of the western states. While I’m on the road I like to find time to try a few new techniques.
For my trip to Laughlin, Nevada I wanted to try a technique that involves taking multiple exposures and using a handheld flash to selectively light portions of the scene. The individual shots are then imported into Photoshop and merged. The result is a photo that has very interesting lighting that can’t be simulated with photoshop techniques alone.
For comparison, here is a photo of the room taken without any supplemental lighting:
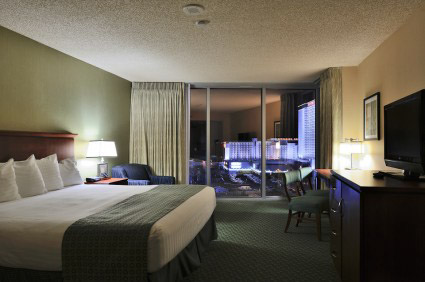
The photo suffers from a lot of problems.
- The reflection of the room in the window ruins the floor-to-ceiling view.
- In order to get a somewhat good overall exposure, the lamps are over exposed, blowing out the detail in the bright areas.
- The lighting is generally boring and doesn’t make the room look as good as it could.
To address these issues I took a series of shots in a few different categories:
- All room lights out and proper exposure for the view through the glass. The dark room helped remove most of the reflections in the glass.
- Multiple exposures using a remote shutter release and a handheld flash on a light stand. The flash was carried around the room and used to light various areas.
- Multiple exposures using the interior lighting. The exposures were bracketed to capture the full range of light that was in the room.
Some photographers will perform only the last step and use software to create a HDR image by merging the exposures and using the best parts of each. If it’s done right, it can look pretty good but most HDR isn’t done very well and ends up looking way too unrealistic.
Additionally, there is no software substitute for actual light. It is possible to boost the exposure of certain parts of an image and create the illusion of spot lighting but it doesn’t compare to the details that are revealed when actual light is captured. Small things like shadows in fabric texture and highlights on the edge of wood surfaces can’t be simulated with software.
The captured images were imported and adjusted so that the white balance and exposure of each image was correct. The adjusted files were imported into Photoshop and merged using layer masks to reveal and conceal the desired portions of each exposure.
Here is the final result:

It still has some issues but I think everyone will agree that it is much more inviting than the first image.
Compare the two shots here:
[baslider name=”HotelRoom”]
I put together a short video that shows each step in the process:
I hope to get a chance to try this technique on a building exterior soon.